Thursday, December 1, 2011

How To Make Vanilla Extract


Making vanilla extract is simple, fun, and fairly inexpensive when compared to how much store bought vanilla extract can be. 

The vanilla bean comes from an orchid and takes an incredible amount of time and care to cultivate. Only one vanilla pod comes from each orchid plant and they need to be hand pollinated. Since the flower only blooms for one day, time is of the essence! It takes about ten months for the pod to mature from the pollinated flower and needs to be harvested at just the right time to ensure quality. The bean pod is then cured before it is used.

Here is the recipe I used, adapted from Rosalee de la Foret. Check out Learning Herbs for great info and recipes!

Vanilla Extract
Makes 1 quart of vanilla which equals 6 -4oz bottles

24 vanilla beans (I used certified organic vanilla beans from Amadeus Trading Company)
4 cups of vodka, bourbon, or dark rum (I did one jar of bourbon and one jar of rum)
1 quart jar with lid

Using a sharp knife, cut the beans in half. You can either scrape out the "caviar" from the inside of the beans or just flay the bean to expose the innards.

Place all of the vanilla beans with innards into the jar. Fill the jar with alcohol of choice and close lid. 

Let the vanilla sit in the jar for 4-6 weeks. The longer the better. You can taste it after 4-6 weeks to see if it is strong enough. 

You can leave the vanilla beans in the alcohol indefinitely. When the jar is 1/4 empty, just add more liquor.

If you are giving the vanilla extract as a gift, strain the vanilla beans out after the desired time and put the extract into an amber bottle with a fresh vanilla pod(optional) and attach a label. The cool thing about vanilla pods is that you can dry them after the extracting process and reuse them to make vanilla sugar. Just place the dried pod in a jar with your choice of sugar and there you go!

What a wonderful gift to give along with a gift-in-a-jar recipe like this one from The Nourishing Home! I added vanilla to mine(-:

I mentioned that I purchased my vanilla beans from Amadeus Trading Company. I highly recommend this company for buying quality organic vanilla beans from. I have spoken to the owner personally and appreciate how much time and energy he takes to ensure the quality of the beans he provides as well as the welfare of the growers. He also provides excellent customer service which is extremely important to me. 

Enjoy your vanilla extract making!!!

*This post is part of Simple Lives Thursday over at GNOWFGLINS.


Saturday, November 26, 2011

Real Food Thanksgiving - Side Dishes - Sweet Potatoes

My Mom's favorite side dish is my Boston Market Style Sweet Potatoes. These are a healthier version that are great for dessert as well as during the main meal. They are really yams but we still call them sweet potatoes(: If you make these they are sure to please and you'll never eat the ones from Boston Market again!


Healthier Boston Market Style Sweet Potatoes

6 cups mashed organic yams(about 6 potatoes)
3/4 cup rapadura or sucanat 
1/2 cup organic cream
1/2 cup melted, organic butter
2 pastured eggs
1 tsp vanilla
1/4 tsp organic cinnamon
1/4 tsp sea salt
2 cups natural marshmallows-completely optional-they taste awesome without them(can be homemade or from stores like Whole Foods)
-You could also use organic marshmallow fluff from Toonie Moonie.

Rub olive oil, butter, or coconut oil on the outside of the washed and dried yams. Bake them in a preheated 400 degree oven for 60-70 minutes until tender. Allow to cool enough to handle and peel the skins off. Place the insides into a large bowl and beat with an electric mixer until smooth.

Add rapadura or sucanat, cream, butter, eggs, vanilla, cinnamon, and salt into the yams and mix well. Pour the mixture into a buttered 13"x9" baking dish and bake for 30 minutes at 350 degrees. Pour marshmallows into yams and swirl until melted. Sprinkle with a little rapadura or sucanat and serve. 

Yum! All this talking about food is making me want Thanksgiving dinner all over again!

Enjoy!


A Real Food Thanksgiving - Side Dishes - Green Beans with Mustard & Thyme

While the turkey is the staple at our table, the sides are what everyone piles onto their plates. It's important to me that I make all side dishes with organic, fresh ingredients. Nothing comes from a can and nothing is processed. My sister's favorite dish is the Green Beans with Mustard and Thyme. I cannot stand green bean casserole. It actually grosses me out so when I found this recipe 13 years ago, it became a tradition at every holiday meal. This is one that we make all year long and not just on holidays.


Green Beans with Mustard and Thyme
adapted from Bon Appetit's November 1999 issue

4 pounds fresh, organic green beans, trimmed
1/2 cup organic butter
3 tbs fresh organic thyme, chopped
2 tbs Dijon mustard
2 tsp garlic salt or 1 tsp garlic powder & 1 tsp sea salt
1/2 cup slivered almonds, freshly toasted

Blanch trimmed green beans in salted, boiling water for 5 minutes. Strain and place into an ice bath and cool completely. This can be done the day prior to cooking. Wrap in cloths or paper towels and place into resealable bags into the refrigerator. 
Melt 1/4 cup butter into each of two heavy skillets or cook in two batches in the same skillet. Whisk 1 tbs thyme, 1 tbs mustard, and 1 tsp of garlic salt(or 1/2 tsp garlic powder & 1/2 tsp sea salt) into butter in each skillet. Add half the beans to each skillet and toss until heated through, about 4 minutes. Season to taste with pepper. Transfer to large bowl and sprinkle with slivered almonds and remaining thyme. 

You'll love this dish and so will your kids!

Enjoy

A Real Food Thanksgiving - The Turkey


Thanksgiving is my favorite holiday. I love cooking up a wonderful meal and spending three days doing it. I've had the privilege of cooking Thanksgiving dinner for the past 13 years, first for my husband and some of the single soldiers from his unit when we were stationed in Germany and now for my family here in the States. Here is the main attraction, the turkey.


Mustard-Rubbed Roast Turkey With Mushroom Gravy
adapted from Bon Appetit's Nov. 1999 issue

With this recipe, start out with a pastured, organic turkey. We purchased ours from our farm co-op. 

For the turkey:
1 cup Dijon mustard
3/4 cup organic butter
2 tbs freshly grated lemon peel
1/4 cup freshly squeezed lemon juice
1/2 cup fresh organic flat leaf parsley, chopped
1 tbs fresh organic thyme, chopped

1 tbs fresh organic sage, chopped

1 15-16 pound organic, pastured turkey
2 cups chicken stock

One to two days prior to Thanksgiving, coarsely puree first 7 ingredients in a food processor or blender. I used my BlendTec. Reserve 1/2 cup mustard mixture in a bowl; cover and chill.
Remove giblets and reserve. Rinse turkey inside and out and pat dry. Slide hand under skin of turkey breast, legs, and thighs to loosen skin. You may need to cut small slits into the skin to do this. Using you hand, spread 1 cup of the mixture under the skin over the breast, legs, and thighs. Spread remaining mixture inside the main cavity. Place turkey into the roasting pan and slide pan into a plastic trash bag. Close the bag and place into the refrigerator for at least one day and up to two days.
On Thanksgiving, position rack in botton third of oven and preheat to 325 degrees. Remove the pan from the bag and spread remaining mustard mixture all over the turkey. Tuck the wing tips under and tie legs loosely together with kitchen twine. Roast for 2 hours. Baste with 1/2 cups chicken stock. Continue to roast (about 15 minutes per pound) until turkey is brown and thermometer inserted into the thickest part of the thigh registers 180 degrees, basting frequently with remaining 1 1/2 cups stock and pan juices.  Cover with roasting pan lid or loosely tent with foil if browning too quickly. Remove from oven and let sit, loosely covered for 30 minutes.

For Gravy:
1 pound white and baby portobello mushrooms, sliced
1 1/4 cups chicken or turkey stock
1/2 cup organic whipping cream
2 tbs organic cornstarch

Pour pan juices into large measuring cup. Spoon off fat, reserving 2 tbs. Heat 2 tbs turkey fat in a large, heavy skillet over medium-high heat. Add mushrooms and saute until soft and tender, about 15 minutes. Add enough broth to pan juices to measure 3 1/2 cups. Add to mushrooms along with cream. Boil 8 minutes to blend flavors. Mix cornstarch with 1/4 chicken stock in a small bowl and mix into gravy. Continue to boil until gravy thickens, about 1 minute. Season with sea salt and freshly ground black pepper and serve over turkey.

Wednesday, October 5, 2011

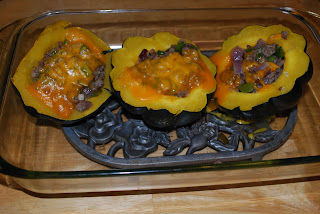
Stuffed Acorn Squash


Most of my family loves squash. Some of us more than other, but we all love this recipe. My husband turned me on to Acorn Squash a few years ago so we came up with this recipe. It's fabulous in during the fall months when Acorn Squash is in season.

I would be remiss if I did not mention why Acorn Squash is such a good food choice. It has many health benefits. It is high in beta-carotene (note the yellow color of the inside) which helps to reduce the presence of free radicals in the body. It also contains vitamin C, potassium, manganese, folic acid (which makes it a great food for pregnant women), and omega 3 fatty acids.

So, without further ado, here is the recipe!


Stuffed Acorn Squash
Use organic ingredients whenever possible.

Ingredients

2-4 Acorn Squash
1 bell pepper, any color
1 onion
4 cloves of garlic
1 lb sausage of choice, loose or casings removed*
1 tsp dried Sage or 1 Tbs. fresh sage
Sea salt and freshly ground pepper to taste
Cheddar cheese

Method

Preheat oven to 375
Place acorn squash on a cookie sheet or glass baking dish and bake until you can easily slice them in half-about 20 minutes.
In the meantime cook sausage and then add onions, garlic and bell pepper, sauté.
Add sage, salt and pepper.
Cut squash in half and scoop out the seeds. Season the inside of each half with salt and pepper. Fill each half with the sausage mixture and bake for approx. 20-30 minutes or until tender.
Cover with cheese and melt.
Serve and enjoy!

Serves 4-8

*We get our meat (and raw milk) from a local food co-op in PA. It's grass-fed and organic. If you are in the NJ/PA area, check them out at www.yourfamilycow.com.


Friday, September 23, 2011

Hot Pepper Relish


I have been getting a lot of peppers from my CSA share lately, especially hot peppers. Peppers are nutritional powerhouses! They are full of vitamins A, and C which are powerful antioxidants along with cancer fighting properties and immune system enhancers. They also have vitamin K which promotes proper blood clotting and protects the cells from oxidative damage. Hot peppers help fight bacteria and boost immunity.

My Husband requested that I make some hot pepper relish so that was my project for the day. Because I was making more than one jar, I decided to can them. I sterilized my jars in the dishwasher on the "Sani" cycle and the lids in boiling water. I added water to my stock pot to boil for canning when I was ready to put in the jars. Meanwhile, it was time to prepare the peppers.

I did have a recipe that I loosely followed. Here is the recipe that I used. It is from Food.com and was posted there by "Gator Lady".

Hot Pepper Relish

Ingredients:

4 large bell peppers, any color
2 red onions
5-10 hot peppers
2 teaspoons salt
1 cup sugar
1 cup apple cider vinegar
2 tablespoons corn starch.

I did not have the exact amounts of peppers the recipe called for. I wore latex gloves to keep the heat of the peppers away from my skin. I seeded the bell peppers and cut the tops off of the cayenne and jalapeno peppers, cut the onions, and peeled the garlic. I kept the seeds in the hot peppers. They can be removed for less "heat".


I then pulsed everything in my food processor so it was nice and fine and added it to a medium-size pot on the stove on medium-high heat while adding organic apple-cider vinegar, celtic sea salt, evaporated can sugar, and organic corn starch. I brought the mixture to a boil and then simmered for 45 minutes, stirring occasionally.


After the peppers were cooked, I got my jars (which were still hot) from the dishwasher, dried the lids, and spooned the peppers into each jar. I have an improvised jar funnel taken from my juicer that works nicely for canning. I filled them with a quarter inch of room at the top of each jar and lidded them. I placed them into the boiling water of my stock pot using tongs, making sure the jars were covered with the water. I placed the lid on the pot and boiled the jars for 10 minutes. I then removed them with the tongs to a hotplate and dried the lids. They will cool overnight and then they can be stored. I can't wait to give a jar to my Dad! He loves hot peppers. This stuff is really hot!!!


It's time to spice things up!!

Enjoy!

~Sarah


Thursday, September 22, 2011

Elderberry Syrup


Elderberry Syrup is one of my favorite cold and flu preventatives and also my go-to remedy to soothe a cold or flu that has already arrived. It is fantastic for coughs as well. It is very inexpensive and so easy to make yourself. A quart of it costs about $5 to make at home versus the upwards of $9 per 4 ounces you will pay at a health food store.

 Black Elderberries, or Sambucus Nigra, have been used for thousands of years to strengthen the immune system. They are a wonderful source of vitamin C. Elderberry Syrup can be taken daily as a tonic and dosage increased when one is ill.

I use the recipe from Rosemary Gladstar from her book "Herbal Recipes for Vibrant Health", but there are many variations to making this syrup. I added comments where needed. This recipe is easily doubled, tripled, and even quadrupled!

Elderberry Syrup

1 cup Fresh or 1/2 Dried Elderberries(I get mine from Mountain Rose Herbs)
3 cups water
1 cup honey(or sugar) - I only use honey if I am not reducing the syrup into a thick cough syrup. *See below for reason.

1. Place the berries in a saucepan and and cover with the water. Bring to a boil, reduce heat and simmer over low heat for 30-45 minutes.
2. Smash the berries. Strain the mixture through a fine-mesh strainer(smashing and mashing as you go to get out all the juice) and add 1 cup of honey, or adjust to taste.
3. Bottle the syrup and store in the refrigerator, where it will keep for at least 2 to 3 months. If you sterilize your bottles and lids first, your will reduce the chance of mold forming where air hits the inside of the jar and lid.
Caution: Use only blue elderberries; the red ones are potentially toxic if eaten in large quantities. Never eat elderberries that haven't been cooked first.
Another word of caution - Elderberry stains....everything! Be careful!
*Because I use raw honey, I do not reduce further after adding because it will kill the enzymes in the honey. Reduce prior to adding the honey or use sugar(evaporated cane sugar).

You can also add freshly grated ginger to this recipe for added medicinal benefits.

I usually give my kids, toddler and up about a tablespoon daily during cold and flu season. I take 2 tablespoons daily.

To Your Health,
~Sarah


Wednesday, September 14, 2011

A Nourished Pregnancy


As I sit here on the cusp of my third trimester with my fourth baby, I've had a lot of time to think about my favorite subject, food. I have been thinking about what a nourished pregnancy looks like. When you look at a pregnant mother who is truly nourished, is she thin? Is she heavy? What does it look like. I believe that every woman's body handles pregnancy differently and in turn, looks different. Some women stay thin looking all over and gain the usual 30 lbs or so but have that healthy pregnancy glow. Others gain all over and may even go over the "recommended" weight gain but again, still have that glow. What I see when I look in the mirror is a mom who while gaining weight all over has maintained her pre-pregnancy clothes size, has beautiful skin, bright eyes, and looks very healthy. With my youngest daughter, I gained just about 30 lbs. I am already almost at 30 lbs and I still have 12 weeks to go! I am not worried though because I am eating what I am supposed to be eating an exercising every day. My body knows what to do and how much it needs to gain. Am I a fan of weight gain? Well, no! Of course not! What woman is? However, it is temporary and it will come off beginning when I hold my beautiful baby in my arms.

So what does a nourished mother eat? I think this will vary mother to mother. If you are a vegan or vegetarian, your nourishment will look different than a mother who follows a more traditional foods way of eating. For me, I try to be mindful of what it seems like my body needs. I loosely follow the Weston A. Price Foundation's recommendations for what to eat while pregnant but it tends to be too much food for me. I drink raw milk every day. During my first trimester I drank well over a quart per day. I was nauseated all day every day and raw milk was the one thing I could drink and feel satisfied from. I eat a lot of vegetables, especially salads with apple cider vinegar, olive oil, and dulse(seaweed) flakes. I belong to a CSA and get a box of vegetables weekly so I have been eating quite a few tomatoes and eggplants as of late. I drink coconut water and pregnancy tea which I think is truly key in being nourished. I get so many vitamins and minerals from the pregnancy tea and feel so amazing when I drink it. *See recipe below. Because I have myself on a regular workout schedule, I feel that the coconut water really replenishes my electrolytes and gives me the potassium I need to avoid leg cramps. I eat pastured eggs from a local farm every morning for breakfast. Eggs are the perfect food with many of the essential vitamins and minerals that mom and baby need to stay nourished. The yolks of my eggs are orange from the chickens being able to roam free and eat grass and bugs like they are meant to.

Some women don't take pre-natal vitamins for a variety of reasons. Even many holistic foodies say they would rather get their vitamins from food than from a supplement. While I agree with that to some extent, I personally do take a pre-natal vitamin. I was introduced to Innate Response during this pregnancy and fell in love with them. I feel like my body needs them and I feel much better when taking them. They are a whole food vitamin and are especially helpful on days when nausea gets the better of you or you just couldn't get everything food-wise that you really needed. They don't smell so they are easy to take. If you are not eating a good, whole food based diet, you do need some kind of whole food based supplementation or you will feel like the life is being drained out of you. What happens is that the baby will get his/her nutrients one way or another. If he/she can't get them from what you are eating, you will start to lose vital nutrients that are stored in organs and bones. You may feel fatigued and be plagued with all sorts of pre-natal woes. Nutrition is SO important, especially during pregnancy. If you don't think what you are eating matters, you are doing both you and your baby a disservice. *I DO NOT recommend prescription pre-natals or over-the-counter pre-natals that use synthetic vitamins. These are not helpful at all. Always consult your midwife or healthcare provider before starting any supplementation.

My all-time favorite food-based supplement is Fermented Cod Liver Oil or FCLO. It gives you your vitamin A and vitamin D as well as your omega-3 fatty acids which are so incredibly crucial for your baby's brain development. This is especially essential in your third trimester when the brain is doing the most development. You can get FCLO from Green Pasture. I also take probiotics as well as drink milk kefir and water kefir. These are great sources of probiotics which are essential for gut health in mother and baby.

Overall, I have been able to stay 99% organic throughout this entire pregnancy. We have gone out to eat a couple of times and I have eaten at other people's houses where they do not eat organic. At home though, I am very strict about what goes into my mouth. No white flour, no white sugar, no caffeine in coffee, no alcohol, no soda(which I don't drink anyway), and minimal sweets...even "healthy" ones. I do occasionally have a cookie or some ice cream. I have a love for baking and happen to own an ice cream maker so I can make raw milk ice cream. Yum!

A nourished mama means a nourished baby. What you eat DOES matter. Be nourished.

Pregnancy Tea Recipe - I put it in a quart jar and my herb amounts vary(I use TBS as my "part")
*Adapted from a recipe by Aviva Jill Romm

2 parts red raspberry leaf
2 parts nettle
1/2 part oatstraw
1/2 part alfalfa
1/4 part red clover
1/4 part rose hips
1 part hibiscus flowers
1/4 part spearmint

Put herbs into a quart jar and cover with hot water. Let steep 4 hours or overnight in the fridge. Strain, sweeten with stevia if preferred and drink throughout the day.

Thursday, September 8, 2011

Ratatouille


This is a seasonal recipe that I used to make with my elementary after-school program. This time of year I need a lot of recipes to use up my squash and eggplant. This one uses both! It's fantastic by itself or as a side dish. I left out the mushrooms this time because I did not have any. I have a ton of Tarragon in my herb garden which is wonderful to use in place of the Oregano in this recipe. I also substitute ghee for the olive oil because I prefer not to heat olive oil. You can purchase ghee from Pure Indian Foods. You can also add a hot pepper in with this recipe to give it some kick and extra flavor. I chop the peppers and onions rather than cut them into rings so my kids will eat them. They love this dish and cleaned their plates!

As always, use organic ingredients whenever possible.
RATATOUILLE

Courtesy of Jeanne Hammonds, A.S.E. Enrichment


1/3 C. Olive oil, butter or ghee
2 cloves garlic, minced
1 large onion, sliced into thick rings or roughly chopped
4 medium zucchini, sliced
¼ pound mushrooms, sliced
1 green or red pepper, seeds removed and cut into rings or roughly chopped
1 medium eggplant, peeled and diced
4 firm tomatoes, quartered
¼ C. fresh chopped parsley
½ tsp. oregano or tarragon
2 tsp. basil
1 tsp. sea salt
1/4 cup or more grated parmesan cheese
ground black pepper to taste


Method


Heat ghee in a large frying pan and sauté garlic and onion until onions are limp.  Add zucchini, mushrooms and pepper and sauté a few minutes longer.  Remove from heat and add the eggplant and tomatoes, parsley, oregano, basil and vegetable seasoning.  Mix well.  Pour into a casserole dish and sprinkle with Parmesan cheese.  Bake at 350 degrees for 30 minutes or until vegetables are tender.  Serve at once.  It can also be served cold along with dark bread and cheese.  Yield:  8 servings


You kitchen will smell amazing!

Enjoy!

Sunday, August 21, 2011

Pesto Chicken and Mixed Veggie Pasta

Today's dinner was inspired by some pesto chicken I got from church. It came from Trader Joe's and I had never tried it before. You can make your own pesto chicken by marinating chicken breasts or thighs in basil, garlic, and ghee(or olive oil), salt, and pepper. This recipe was like an explosion of flavor in my mouth. There's so much flavor! I didn't want dinner to end!!! Here it is:

Pesto Chicken and Mixed Veggie Pasta
by Sarah Outlaw
(Use organic ingredients whenever possible)

3-4 Chicken Thighs or Breasts Marinated in Pesto Sauce
1 Shallot
1 Onion
1 Large Clove Garlic or 4 Small Cloves
1 Green Bell Pepper
1 Small Jalapeno Pepper
1 Small Eggplant
1 Zucchini
1 Patty Pan Squash
2 Tomatoes
1 Handful Fresh Basil (chopped)
1 Handful Fresh Parsley (chopped)

1 Package Whole Wheat Spaghetti or Gluten Free Option Cooked as Directed

Tip: Salt and Pepper after each addition.

Chop vegetables so they are cubed and somewhat uniform in size.

Place peppers, onions, shallot, and garlic in a bowl. Place squash and eggplant in a separate bowl.

Coat saute pan with Ghee and cook chicken until almost cooked through. Remove from pan and slice chicken.

Saute pepper mixture and add squash mixture. Cook until slightly soft. Add chicken and cook through. Add tomatoes and herbs.

I added a ladle-full of stock that I had on-hand for some extra liquid but you can add some of the pasta water.

Serve with grated cheese.

Enjoy!

~This is an original recipe. Please do not repost without giving proper credit. Thank you.

Monday, March 14, 2011

Homemade Organic Chocolate-Hazelnut Spread (Nutella)

I have arrived! I made my own Nutella! Ta-Da! That's how I felt yesterday when I tasted my homemade Nutella and it tasted just like the "real thing". Our family loves Nutella. I fell in love with it when I lived in Germany. I couldn't get enough! Imagine my excitement when I discovered that I could make it on my own!

I got this recipe from The Family Kitchen Blog and they got it from David Lebovitz. It varies from the original Nutella recipe because it uses chocolate instead of cocoa powder. My version is varied in that I used all organic ingredients and raw milk. I also did not have milk chocolate so I used semi-sweet and dark.

Homemade Organic Chocolate-Hazelnut Spread (Nutella)

1 1/2 cups whole organic hazelnuts (I got mine from the bulk bin at Whole Foods)
1 1/2 cups milk (mine is raw)
3/4 cups powdered milk (mine is Organic Valley)
1 Tbsp honey (mine is local, organic, raw)
Pinch of sea salt
1 heaping cup chopped bittersweet or semisweet chocolate or chips (I used organic)
1 scant cup chopped milk chocolate or chips (I used dark)

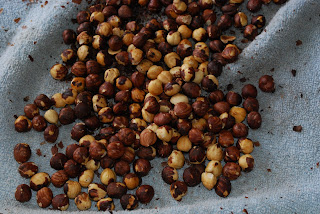
Toast the hazelnuts on a rimmed baking sheet at 400 degrees for 10 minutes (or until fragrant and their skins begin to pop). Transfer to a hand towel and rub the skins off. Transfer to a BlendTec, Vitamix, or food processor and blend until they become pasty and thick like peanut butter.


Warm the milk, powdered milk, honey and salt in a saucepan until right before boiling if you are using raw milk. You can bring it just to boiling if you are using already pasteurized milk. Remove from heat.


 Melt the chocolate in a separate bowl. 

Add the melted chocolate to the ground nuts and continue blending. Add the milk mixture and blend until it is as smooth as it can get. It's a bit thin so put it into a container and refrigerate it. I keep mine in the fridge because of the raw milk It says that it yields 2 cups but mine was more like 4 cups.


It's awesome!

Enjoy, and Keep it Real!

~Sarah

Thursday, March 3, 2011

Real Milk is Raw Milk - Guest Post for Lilith's Apothecary

I had another great opportunity to write a guest post for the Lilith's Apothecary Blog. I chose the topic of raw milk this time. Not drinking conventional milk is something I feel very strongly about. Go on over and take a look!

Real Milk is Raw Milk

Enjoy!

Keep it real!

~Sarah

Tuesday, March 1, 2011

Tyler's “Healthy Junk Food” Carrot-Applesauce Muffins

Oh goodness! Has it really been two weeks since I posted last? Where has the time gone? I am posting an oldie but a goodie here today. These are my son's favorite muffins. In fact, I named them after him after creating this recipe specifically for him. It is a variation on a classic. He was craving something sweet but didn't want fruit at that moment so muffins it was! Chances are, your kids will love them too! I've been passing this recipe around for a few years to my friends, making them with my elementary cooking classes, and even had it published in the first Holistic Moms Network Cookbook. I would love for you all to have it! I am working on an even healthier "soaked" version of this recipe. I will post the results and method as soon as I get it perfected.


Tyler's “Healthy Junk Food” Carrot-Applesauce Muffins

Use organic ingredients whenever possible.

1 1/4 cup whole-wheat pastry or spelt flour (can substitute gluten-free flour)
1 teaspoon baking soda
1/4 teaspoon salt
1/2 teaspoon ground cinnamon
1/4 teaspoon ground nutmeg
1/4 cup melted coconut oil, or melted butter.
3/4 cup evaporated cane juice sugar (or Rapadura)
2 large cage-free (preferably farm fresh) eggs
1/2 cup organic applesauce
1/2 teaspoon natural vanilla
1 1/2 cups finely shredded organic carrots (about 2 medium carrots)
1/4 cup plus 2 tablespoons finely chopped organic walnuts (optional)

For Icing: Optional
1 pkg organic cream cheese
1 stick organic butter(unsalted)
1/2 tsp natural vanilla
1/2 tsp fresh, organic lemon zest(optional)
Honey, Sugar, or Stevia to taste


Preheat the oven to 350 degrees F. Line 12 muffin cups with paper liners or grease with coconut oil or butter.
Sift together the first 5 ingredients. In a large bowl, whisk the oil, sugar and eggs until well combined. Whisk in the applesauce, vanilla and carrots. Add the dry ingredients and mix until combined.

(optional) Stir in 1/4 cup of the chopped walnuts.

Divide the batter between the muffin cups. Bake until a toothpick comes out clean, about 20 minutes. Transfer to a wire rack to cool completely.

Optional Icing:
With an electric mixer, beat together the cream cheese, butter, vanilla, sweetener, and lemon zest until smooth and creamy. Frost the cooled cupcakes and sprinkle with the remaining 2 tablespoons chopped walnuts. The cupcakes should be stored in the refrigerator if iced.


Makes: 1 dozen full-size cupcakes.


Nutritional facts:
Coconut oil is the healthiest oil to cook with because it does not break down when heated. It is a healthy fat that is good for your body. Don't be afraid of healthy fats! Your body needs them! Rapadura sugar is an unprocessed, unrefined sugar that you can find at Whole Foods or Wegmans. Organic carrots are best because they do not have chemical nitrites in them from fertilizers. All ingredients used can be purchased at Whole Foods or Wegmans. Some ingredients can be found at Trader Joe's.

Enjoy and keep it real, especially for your kids!

~Sarah


Shared at Monday Mania

Tuesday, February 15, 2011

Valentine's Day Family Dinner


Yesterday was Valentine's Day and to celebrate the occasion I decorated and cooked up an organic, gourmet meal for my husband and family.


I went to Delish.com and found a few recipes that I liked for the entrée, Pepper-Crusted Filet Mignon, and the dessert, Romantic Molton Chocolate Cakes. I hit up allrecipes.com  for the Gourmet Mushroom Risotto, and myrecipes.com for the Raspberry Asparagus. I used all organic ingredients whenever possible in place of the conventional ingredients listed in the original recipes. I eat in season but made an exception for the holiday with the use of berries. 

The Main Course


The Molton Chocolate Cake

 It was divine!


No Valentine's Day is complete without chocolate covered strawberries. These are organic strawberries with organic chocolate.


Here is the recipe for the Molton Chocolate Cakes. I couldn't find it written, just the video (which is quite helpful) so I thought I would jot it down and make it easy on you. You will definitely want to make these!

Romantic Molton Chocolate Cakes

4 oz bittersweet chocolate
4 oz butter

2 egg yolks
2 whole eggs
4 oz sugar
1 tsp. vanilla
pinch of salt

4 Tbs flour (I used whole wheat pastry)

Strawberries
Powdered sugar

Preheat oven to 400 degrees
Butter 4 or 5 4-6 oz ramekins

Melt Butter and chocolate in a saucepan on low heat. Do not let boil - just melt.

Turn off heat and in a bowl, mix the next 5 ingredients. Add the chocolate. Stir. Fold in flour. Pour into prepared ramekins and bake for 20 minutes. Let cool for a few minutes and take a knife around the edges so that you can flip the over onto your plates. Dust with powdered sugar and arrange a sliced strawberry on top. Serve warm.

Yields 4 1/2 cakes. I needed 5 so I made 4 regular size and 1 half size for my youngest child.

These are delicious!

Enjoy!

Keep it Real!
~Sarah


Flaxseed: Why's & How's - Guest Post for The Marathon Mom

My dear friend, Brandy, The Marathon Mom asked me to write a guest post about flaxseed.


Here it is over at The Marathon Mom Blog - Flaxseed: How's & Why's

Enjoy!

~Sarah

Friday, February 11, 2011

Getting a Jump Start on Valentine's Day with Strawberry Pancakes


I was baking last night (I bake almost every night) to have some muffins for my kids to snack on and to take to my Grandparent's house today and decided to make pancakes for this morning. I found a recipe from Cooking God's Way that I have been wanting to try. It's for Easy Blender "Overnight" Pancakes. The recipe calls for blueberries, which I ran out of making their Ultimate Whole-Grain Blueberry Muffins so I substituted frozen, organic strawberries. A little Soap Box moment here: Please don't use non-organic berries. They are at the top of the Dirty Dozen List for pesticides. You can get a cool wallet guide of the list at Food News. I keep mine on my fridge. Paying a few cents extra for pesticide-free food will really help your children develop properly. A new study on pesticides and children came out today over at Natural News that you may want to take a look at.

Back to the pancakes...I didn't have buttermilk nor did I feel like making my own late at night so I used raw milk and simply added a splash or two of apple cider vinegar to the batter. Soaking the grains overnight makes them easier to digest by breaking down the phytic acids or "anti-nutrients". Cooking God's Way offers a Free E-course that teaches the basics of Real Food including a lesson on soaking grains. I highly recommend it.

Go out and grab the ingredients you need and after dinner tonight, prepare the batter for these delicious pancakes. Tomorrow morning you will be able to make them in 5 minutes and your kids will say that you should work at IHop! Mine did.

Enjoy!

Keep it Real!

~Sarah

Wednesday, February 9, 2011

Saturday, January 29, 2011

Vegan and Organic Chocolate Banana Muffins

My friend, Stephanie over at the Green Earth, Green Home Blog recently shared a recipe for Vegan/Organic Chocolate Banana Muffins. This recipe was given to her by Cassie, the proprietor of the Pomegranate Cafe in Phoenix, AZ. If you are ever in Phoenix, be sure to stop in and say hello! I made these today and can I just say, these are the BEST muffins I have ever eaten in my life! My kids said the same thing as well as a dear friend who stopped by today. This recipe uses maple syrup, and coconut oil to create the moistest, most decadent banana muffin you will ever eat. 
Here is a link to the recipe for these must-bake muffins.
Enjoy!!!

Saturday, January 22, 2011

Saturday Morning Recipe - Apple-Cinnamon Waffles


My favorite thing to do on a Saturday morning is cook. Being able to take my time and make a good nutritious breakfast is really important to me. During the week I make variations of eggs or slow-cooker oatmeal for the sake of time, but on Saturdays I can go all out. This morning we had one of our favorites: Apple-Cinnamon Waffles. This is my originally my Mom's recipe that I modified. There almost was no picture for these because my kids were eating them faster than I could stack them!


Apple-Cinnamon Waffles
(or Pancakes)


Ingredients:
1 1/2 cup organic, whole wheat pastry flour (or substitute your favorite gluten-free flour)
1/2 teaspoon sea salt
3/4 teaspoon organic cinnamon
1 tablespoon organic evaporated cane (Rapadura) sugar or raw honey
2 teaspoons aluminum-free baking powder
2 free-range, organic eggs -- separated
1 cup organic milk (I use raw)

1 tsp. vanilla (optional)
3/4 cup peeled grated organic apples
1/4 cup organic butter or coconut oil

Extra organic butter and organic maple syrup (I use Grade B maple syrup) or honey for topping.


Directions:
 Sift together flour, salt cinnamon, sugar and baking powder.
 Beat egg yolks; add milk and vanilla.
 Combine with dry mixture; add apples and melted butter (or oil).
 Beat egg whites until stiff and fold into batter.
 Bake until golden brown in hot waffle iron or pancake griddle.
 Top with organic butter and maple syrup or honey.

Enjoy!


Love,
Sarah

Tuesday, January 18, 2011

How to Make Kombucha

Kombucha is my favorite fermented drink. I am drinking some as I write this blog! It is a tea that is fermented using a SCOBY (Symbiotic Colony of Bacteria and Yeast). The SCOBY is also referred to as the "Mother", as in "mother of vinegar" or a mushroom because of its appearance. Kombuca's origins are in Russia but it is often credited to the Chinese and Japanese. In doing some research I found that the Kombucha we make here in the U.S. is not the same beverage that is made in Asia so I am giving the credit to Russia.


The bacteria in Kombucha acts as a probiotic in the gut which promotes good intestinal flora. Since most illness start in the gut (if not all), good gut health is crucial. Other benefits are that it is antimicrobial and full of antioxidants. It may even help relieve symptoms of autoimmune diseases like fibromyalgia and even help alleviate mild depression. Kombucha is also rich in enzymes, vitamin B, and amino acids. 


Kombucha is very easy to brew at home. It is made by combining the SCOBY, tea, and sugar. The SCOBY feeds off of the sugar and ferments the tea. All you need to make you own is a Kombucha SCOBY, water, black or green tea, sugar and some containers. You can purchase a SCOBY locally from a farm or online at Cultures for Health. The best way to obtain a SCOBY is to get one from a friend. They multiply after each batch so friends are willing to share the wealth.


Care must be taken to keep the SCOBY as sterile as possible as not to contaminate it. Always wash containers in very hot to boiling water and make sure you do not use any chemical soaps to clean surfaces that will touch the SCOBY. 


Basic Method:


Boil 3 quarts of water. 
Place 4 black or green tea bags (preferably organic tea) in a large glass bowl and add boiling water.
Add 1 Cup of sugar. I use evaporated cane sugar but even white sugar can be used here because it will all be gone when you drink the tea.
Wait until the tea is warm or slightly cooled down and add either 1/2 cup of vinegar or 1/2 cup of Kombucha from a previous batch.
Add the SCOBY. Be sure the tea is not hot!. Heat will kill it so do not add it to the hot water.
If you are using a large bowl you will need to put masking tape over the top like this picture shows so that your cover will not fall into the tea. You could alternatively use a cheesecloth with a rubber-band securing it to the bowl or a narrower jar. 


Cover the tea and place the bowl in a warm location. I have mine on my dining room table.
Leave for about a week. It will take longer to ferment in a cooler room. You can taste test through a straw for desired sourness. The more sour it is, the more healthful but definitely do it to your taste or you may not drink it regularly. If you leave it to ferment it will turn to vinegar.
When the tea has reached its desired fermentation, remove the SCOBY, which will have formed another at the top of your bowl, and strain the Kombucha into a glass jar or bottle and store in the refrigerator. It will keep for a very long time, some say forever, but I say try to drink it within a few months.


Store your SCOBYs in the refrigerator in a small amount of Kombucha. They will stay "dormant" until you need them again. 


There are other ways of brewing Kombucha but to start out, this is a good basic foundation.


Feel free to comment if you have any questions.


Enjoy!


In Health,


Sarah

Wednesday, January 12, 2011

Archived Real Food Articles

A few years ago I was given the opportunity to write a series of articles for Natural Life 101, a natural health blog that is currently undergoing maintenance. Stephanie, the owner of that blog now has a great store called Green Earth Green Home and a Family Blog to go along with it. Here is a list of some of the articles in that series having to do with Real Food:

Happy Organic Thanksgiving
Have a Healthy Holiday
A Healthier You
A Healthier You Part II
Eating the Rainbow
Extraordinary Foods

Enjoy!

Love,
Sarah

Monday, January 10, 2011

Winter Foods - 17 Bean and Barley Soup


Winter can be beautiful with snow, and ice skating, and nights cuddled up in front of the fire. It is a time when harvest is over except for some lingering winter crops and it is time to nourish the body with warming foods. Soups are wonderful this time of year to get a lot of nourishing ingredients into you at once. The immune system loves the boost a healthy soup brings to it after a full day of fighting off germs and the cold. Bone broths are especially nourishing and are full of mineral like calcium that is crucial to health. I realize that some of the terminology that I use may not be familiar to everyone. I will be blogging about how to make all of the basic essentials in future posts but wanted to share a recipe that my family loves in the winter.


I took the recipe from the back of the bag of Trader Joe's 17 Bean & Barley Soup and modified it. This recipe will work with any and every combination of 1 lb. of beans. Use organic ingredients whenever possible.


15 Bean & Barley Soup


1 lb. of beans ( I used Trader Joe's 17 Bean & Barley Soup)
64 oz of vegetable or chicken stock
1 large onion - chopped
4 stalks of celery - chopped
4 carrots - chopped
1 green or red bell pepper - chopped
1 tsp. dried basil
4 cloves garlic - crushed or chopped 
2 Tbsp. extra virgin olive oil (added after cooking has ended)
1 bay leaf
1/2 tsp. Italian seasoning
1 can/jar of chopped tomatoes (Muir Glen and Trader Joe's use BPA-Free cans)
Sea salt and freshly ground black pepper to taste.
Ghee, butter, lard, tallow, or coconut oil to sauté vegetables.


Optional addition - I sometimes add a container of Trader Joe's organic red pepper and tomato soup to the pot. It add a richer flavor to it. 


Soak beans overnight covered in water. I soak mine for up to three days, draining and rinsing each day.


Rinse, drain, and set aside until needed.


Sauté vegetables in fat of choice until soft. Add basil.


Add broth, other seasonings, tomatoes, and beans. Simmer from 1 hour to all day if desired. This can also be made in a crock pot.

Season with salt and pepper and serve.


I serve it with a little freshly grated cheese and with bread. The kids love it as much as we do!

Enjoy!

Love,
Sarah